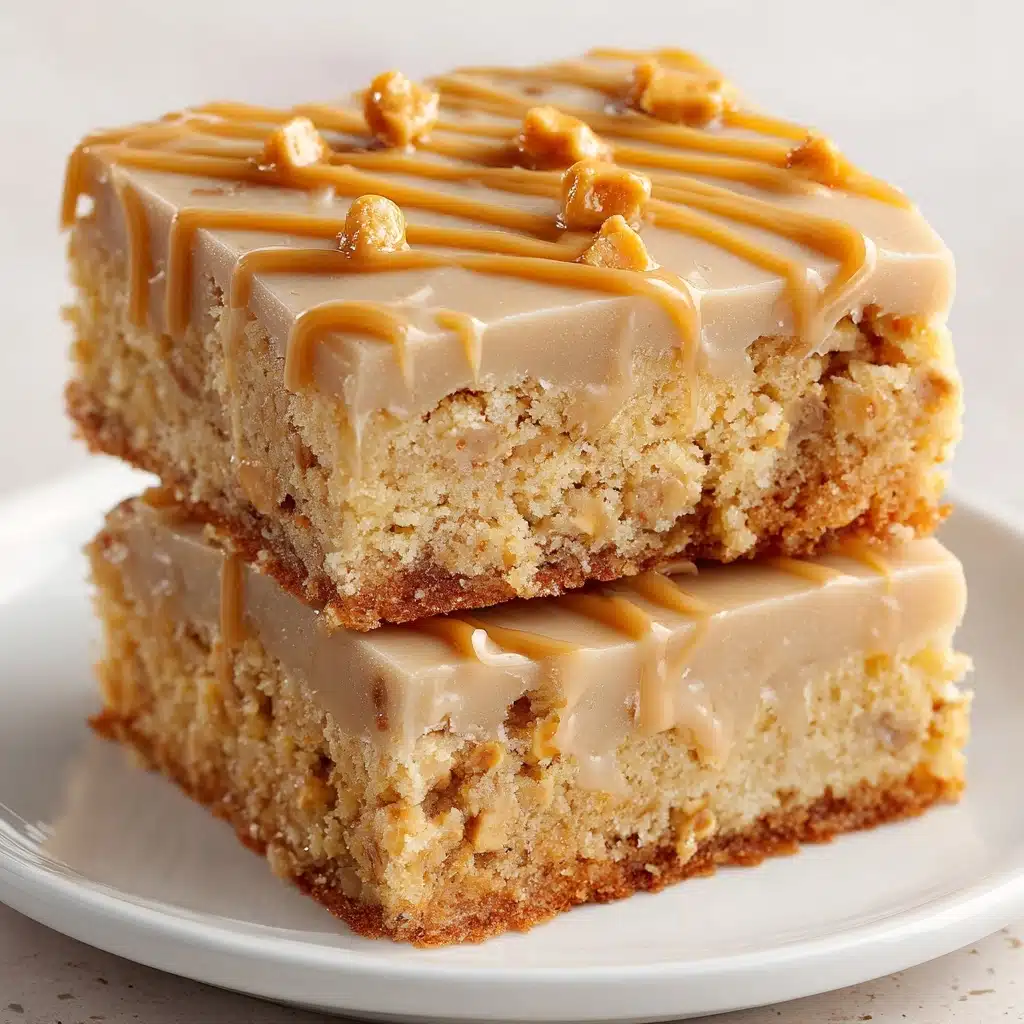
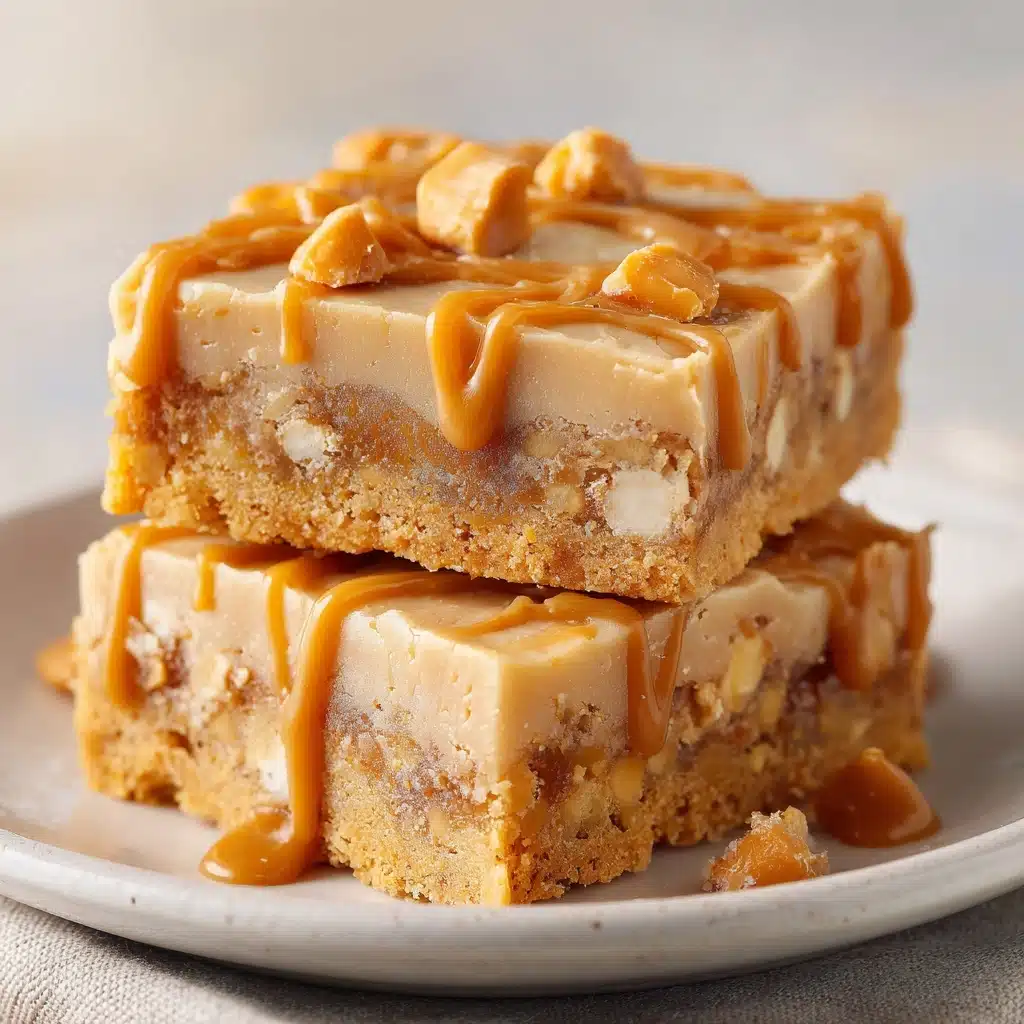
Peanut Butter Lunch Lady Cookie Bars Recipe
If you’re looking for a nostalgic, utterly irresistible treat that comes together with pantry staples and a hint of school-day magic, let me introduce you to these Peanut Butter Lunch Lady Cookie Bars! Chewy, peanut buttery, swirled with melty chocolate chips, and finished with a swoon-worthy peanut butter frosting, they truly capture everything we loved about cafeteria desserts—only better, because now you can whip them up at home and cut yourself the biggest piece.
Ingredients You’ll Need
The beauty of Peanut Butter Lunch Lady Cookie Bars is how simple, classic ingredients combine to create something unforgettable! Each element plays a key role, from texture to taste, and every bite showcases their harmony.
- Unsalted butter (softened): Gives the bars their rich, moist texture. Make sure it’s soft so it creams easily and evenly combines with the sugars.
- Creamy peanut butter: Adds that signature nutty flavor and lush chew in both the base and the irresistible frosting.
- Granulated sugar: Brings sweetness and helps the edges crisp up just right.
- Brown sugar (packed): Delivers extra softness and a caramel note—don’t skip the packing, it makes a difference!
- Large eggs: Bind everything together while adding a little lift to keep things cakey yet fudgy.
- Vanilla extract: Rounds out the flavors and ties the dough and frosting into true cookie bliss.
- All-purpose flour: Provides the structure you need for perfect bar cookies.
- Baking soda: Ensures the bars rise just enough without being too cakey.
- Salt: Enhances all the sweet and nutty flavors—don’t leave it out!
- Old-fashioned oats: Give that hearty, classic cafeteria cookie chew and depth. Stick with old-fashioned oats for absolute best texture.
- Semi-sweet chocolate chips (divided): Create puddles of melty chocolate throughout and a fun sprinkle on top.
- Creamy peanut butter (for frosting): The starring ingredient in the luscious, dreamy frosting layer.
- Powdered sugar: Makes the frosting smooth and sweet, with just the right thickness to spread beautifully.
- Milk: Thins out the frosting so it glides effortlessly over the bars. Start with less and add more as needed!
How to Make Peanut Butter Lunch Lady Cookie Bars
Step 1: Preheat and Prepare Your Pan
Set the scene for success by preheating your oven to 350°F and generously greasing a 9×13-inch baking pan. This ensures your Peanut Butter Lunch Lady Cookie Bars release easily and bake up with beautiful, golden edges. If you prefer, you can also line the pan with parchment paper for super-easy removal and clean-up.
Step 2: Cream Together Butter, Peanut Butter, and Sugars
In a large mixing bowl, beat the softened butter, 1 cup of creamy peanut butter, granulated sugar, and brown sugar together until light and fluffy. This step is key, as thoroughly creaming these ingredients ensures a soft, bakery-style cookie bar that’s packed with flavor in every bite.
Step 3: Add the Eggs and Vanilla
Mix in the eggs and vanilla extract until everything is smooth and uniformly combined. Don’t rush this part—the better the eggs and vanilla become incorporated, the more even your bars’ texture will be!
Step 4: Combine Dry Ingredients
In a separate bowl, whisk together the all-purpose flour, baking soda, and salt. This quick mix evenly distributes the leavening agent and salt for perfect baking and flavor in your Peanut Butter Lunch Lady Cookie Bars.
Step 5: Mix Dry Ingredients into Wet Mixture
Gradually add the dry mixture to the wet ingredients, mixing until just combined. The dough will look thick and sturdy—exactly what you want for those classic, hearty cookie bars!
Step 6: Fold in Oats and Chocolate Chips
Stir in the old-fashioned oats and 1 cup of chocolate chips. These mix-ins won’t just add flavor; they give every bar that irresistible chewy bite and bursts of chocolate you remember from good old cafeteria treats.
Step 7: Spread and Bake
Evenly press the dough into your prepared pan, taking a moment to smooth out the top. Pop it in the oven for 22 to 25 minutes, or until golden on the edges and just set in the center—don’t overbake if you want them chewy!
Step 8: Cool Completely
Let the bars cool completely in the pan. This helps them set up perfectly and makes spreading the frosting easier (plus, you won’t risk a gooey mess!). Resist the urge to rush—your patience will pay off.
Step 9: Make the Peanut Butter Frosting
Melt the remaining ½ cup of peanut butter in a microwave-safe bowl until smooth and pourable, then combine with powdered sugar and milk. Whisk until you have a creamy, spreadable frosting, adjusting milk as needed for your desired consistency.
Step 10: Frost and Finish
Spread the luscious peanut butter frosting over the cooled cookie bars. Scatter the remaining ½ cup of chocolate chips over the top, then let the frosting set before cutting into bars. Now, it’s officially time for your first bite!
How to Serve Peanut Butter Lunch Lady Cookie Bars
Garnishes
Dress up your Peanut Butter Lunch Lady Cookie Bars with a little sprinkle of flaky sea salt for a sophisticated finish, or add a handful of chopped peanuts for extra crunch. A light dusting of powdered sugar or even a drizzle of melted chocolate takes these straight to bake-sale superstar status.
Side Dishes
Pair these bars with a big glass of cold milk—the classic, unbeatable combo! For a fun twist, serve alongside fresh berries, vanilla ice cream, or a hot mug of coffee, turning snack time into a dreamy dessert moment.
Creative Ways to Present
Stack them sky-high on a vintage cake stand for a retro bake-sale vibe, tuck into lunchboxes as a sweet surprise, or wrap individually in parchment with a ribbon for a charming homemade gift. For parties, cut them into bite-sized squares and arrange on a platter with other cafeteria classics!
Make Ahead and Storage
Storing Leftovers
Peanut Butter Lunch Lady Cookie Bars store beautifully at room temperature in an airtight container for up to 4 days. The flavors meld even further as they sit, making them just as delicious (if not better) the next day.
Freezing
These bars are born for batch baking—simply freeze cut bars in freezer-safe containers, separated by parchment, for up to 3 months. Thaw at room temperature when you’re craving a retro treat.
Reheating
If you love your bars warm and gooey, just microwave a single bar for about 10-15 seconds. The chocolate chips will get all melty, and the frosting softens up—total comfort!
FAQs
Can I use crunchy peanut butter instead of creamy?
Absolutely! Crunchy peanut butter will add a bit of texture and extra nutty bites throughout your Peanut Butter Lunch Lady Cookie Bars. If you like a little crunch, go for it!
Should I use quick oats or old-fashioned oats?
Old-fashioned oats are ideal because they give the bars a chewy, hearty texture reminiscent of school cafeteria cookies. However, if it’s what you have on hand, quick oats will work in a pinch—just expect a slightly softer bar.
Can I double this recipe?
Yes, you can double the recipe for a crowd! Use two 9×13-inch pans or a single half-sheet pan. Just keep an eye on baking time and don’t overcrowd the batter to ensure even baking.
How do I cut the bars cleanly?
For perfect squares, let the frosted bars set completely before cutting. Use a sharp knife (wiping it between cuts) for neat edges. Chilling the pan for 15 minutes before slicing also helps!
Are Peanut Butter Lunch Lady Cookie Bars safe for nut allergies?
Unfortunately, these bars aren’t safe for those with peanut allergies. If you need a nut-free version, you could experiment with sunflower seed butter, but be sure to check all ingredients for allergy information first.
Final Thoughts
I can’t recommend these Peanut Butter Lunch Lady Cookie Bars enough if you want a comforting, nostalgic treat that always wows a crowd. Gather your ingredients, share a panful with friends or family, and enjoy that classic combination of peanut butter, oats, and chocolate, all bundled up in a soft, chewy bar. You’re going to love every bite!
Print
Peanut Butter Lunch Lady Cookie Bars Recipe
- Total Time: 40 minutes
- Yield: 24 bars 1x
- Diet: Vegetarian
Description
Indulge in the nostalgic flavors of classic Peanut Butter Lunch Lady Cookie Bars. These chewy and decadent bars are loaded with creamy peanut butter, oats, and chocolate chips, topped with a luscious peanut butter frosting.
Ingredients
Main Dough:
- 1 cup unsalted butter (softened)
- 1 cup creamy peanut butter
- 1 cup granulated sugar
- 1 cup brown sugar (packed)
- 2 large eggs
- 1 teaspoon vanilla extract
- 2 cups all-purpose flour
- 1 teaspoon baking soda
- ½ teaspoon salt
- 1½ cups old-fashioned oats
- 1½ cups semi-sweet chocolate chips (divided)
Peanut Butter Frosting:
- ½ cup creamy peanut butter
- 1 cup powdered sugar
- 2–3 tablespoons milk
Instructions
- Preheat and Prepare: Preheat the oven to 350°F and grease a 9×13-inch baking pan.
- Mix Wet Ingredients: In a large bowl, cream together butter, 1 cup peanut butter, granulated sugar, and brown sugar until light and fluffy. Add eggs and vanilla, mixing until smooth.
- Combine Dry Ingredients: In a separate bowl, whisk together flour, baking soda, and salt. Gradually add the dry ingredients to the wet mixture.
- Add Mix-Ins: Stir in oats and 1 cup of chocolate chips.
- Bake: Spread the dough into the prepared pan and bake for 22–25 minutes until golden brown. Cool completely.
- Make Frosting: Melt ½ cup peanut butter, then combine with powdered sugar and milk until smooth.
- Frost and Serve: Spread frosting over cooled bars, sprinkle with remaining chocolate chips, and let set before cutting into bars.
Notes
- These bars freeze well and are great for making ahead.
- You can substitute quick oats if desired, but old-fashioned oats give the best chewy texture.
- Prep Time: 15 minutes
- Cook Time: 25 minutes
- Category: Dessert
- Method: Baking
- Cuisine: American
Nutrition
- Serving Size: 1 bar
- Calories: 260
- Sugar: 20g
- Sodium: 160mg
- Fat: 14g
- Saturated Fat: 5g
- Unsaturated Fat: 7g
- Trans Fat: 0g
- Carbohydrates: 30g
- Fiber: 1g
- Protein: 4g
- Cholesterol: 25mg