Kiev Cake Recipe
If you love desserts with bold character, intricate textures, and a storied pedigree, you need to try Kiev Cake. This towering Ukrainian classic boasts feather-light hazelnut meringue layers sandwiched with impossibly creamy, buttery frostings—some chocolate, some vanilla. Each bite dances between crunch and cloud, nutty richness and mellow sweetness, all coming together in a cake that’s equal parts celebration and comfort. Whether you’re bringing a showstopper to the table or indulging in a new baking adventure, Kiev Cake will win hearts and spark conversation as only the best desserts can.
Ingredients You’ll Need
Amazing as Kiev Cake looks and tastes, the component list is refreshingly simple. Every ingredient serves a distinct purpose—creating that signature crisp-crunchy meringue, lending nutty flavor, or making the silk-smooth fillings that bind it all together.
- Egg Whites (8 large, room temperature): Give the meringue its unforgettable airy lift and crisp-tender crumb.
- Granulated Sugar (1 1/4 cups): Sweetens and stabilizes the meringue for glossy, beautiful layers.
- Finely Chopped Toasted Hazelnuts or Cashews (1 cup): Infuse nutty aroma and delicate crunch—lightly toasting them makes all the difference!
- All-Purpose Flour (2/3 cup): A touch of flour creates structure in each delicate layer.
- Cream of Tartar (1/4 teaspoon): Helps the egg whites whip to stiff, stable peaks, resulting in lofty meringue.
- Pinch of Salt: Enhances flavor and balances sweetness.
- Unsalted Butter (1 cup, softened): The base for that irresistibly rich and fluffy buttercream filling.
- Sweetened Condensed Milk (1 can, 14 ounces): Adds creaminess, sweetness, and custard-like richness to the frosting.
- Pure Vanilla Extract (1 teaspoon): Brings aromatic warmth to the buttercream for deeper flavor.
- Cocoa Powder (1/4 cup): Turns half the frosting into a luscious, chocolatey dream—don’t skimp on quality here!
- Confectioners’ Sugar (2 tablespoons, optional): For a flawless finish, lightly dusted over the cake right before serving.
How to Make Kiev Cake
Step 1: Prepare the Cake Pans and Oven
Start by preheating your oven to 300°F (150°C). This gentle temperature is key for coaxing that signature Kiev Cake meringue texture: crisp on the outside, yet meltingly tender. Line two 9-inch round cake pans with parchment paper on the bottom—this keeps your delicate layers from sticking—and lightly grease the sides for easy release.
Step 2: Whip the Egg Whites and Sugar
In a large, absolutely clean mixing bowl, add your eight room temperature egg whites, a pinch of salt, and cream of tartar. Begin beating at medium speed until soft peaks form. Now, gradually rain in the granulated sugar, a little at a time, while beating. Keep going until stiff, glossy peaks appear; this is the heart of Kiev Cake’s legendary structure and sheen!
Step 3: Fold in Nuts and Flour
Time to transform that meringue into something even more magical. Gently scatter in your sifted flour and the finely chopped, toasted hazelnuts (or cashews). Use a wide spatula to fold them in—keep your strokes light to avoid deflating the masterpiece you’ve just whipped up. This step guarantees nutty flavor in every bite.
Step 4: Bake the Meringue Layers
Spoon the meringue batter evenly between your prepared pans, smoothing the tops with an offset spatula or the back of a spoon. Slide them into the oven and bake for 45 to 50 minutes; you’re looking for firm, lightly golden layers. When finished, turn off the oven, prop the door open a crack, and let the meringues cool completely inside. This patience pays off with flawless, crack-free layers worthy of any celebration.
Step 5: Make the Buttercream Filling
Ready for pure decadence? In a large bowl, beat softened butter until it’s incredibly light and fluffy—don’t rush, as creaminess is the goal! Gradually pour in the sweetened condensed milk, continuing to beat, then add the vanilla extract. Divide the finished cream in half: stir cocoa powder into one half for a deep chocolate layer, leaving the other half beautifully vanilla.
Step 6: Assemble the Kiev Cake
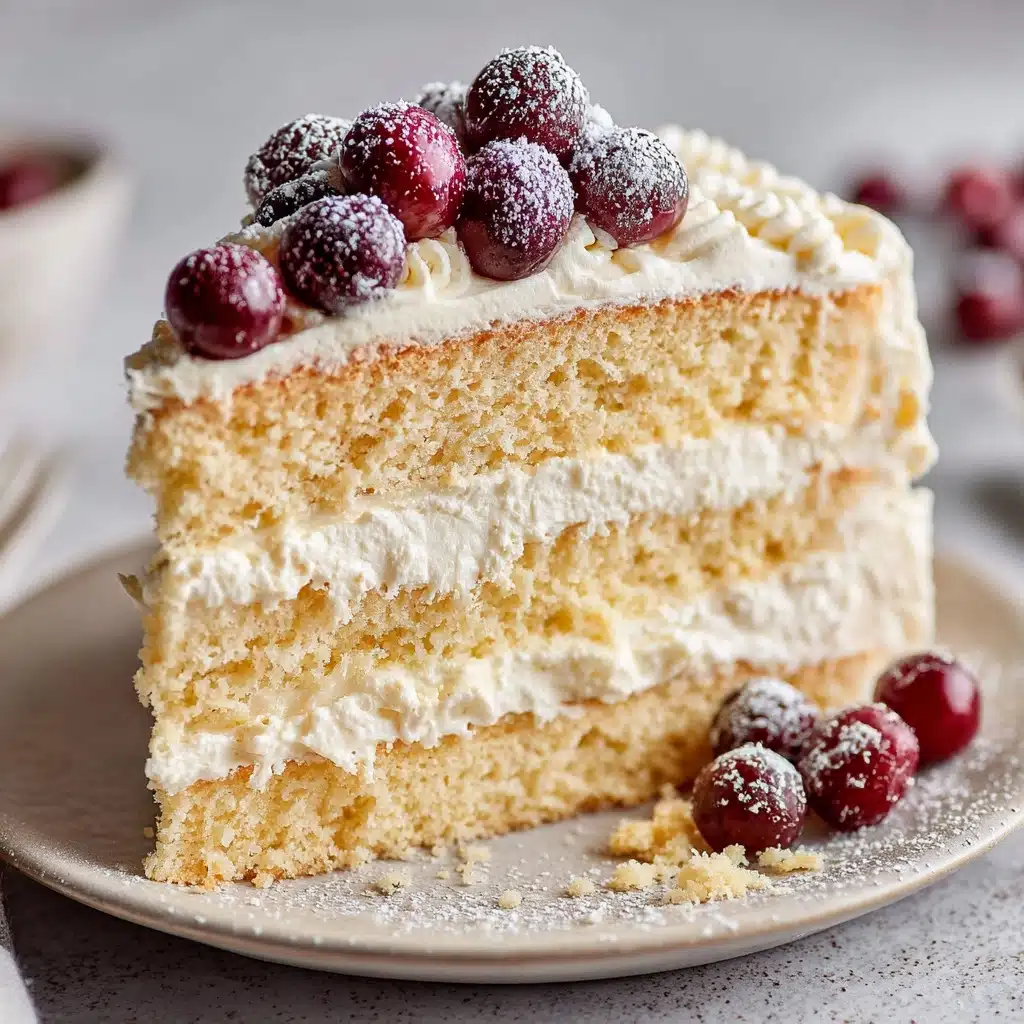
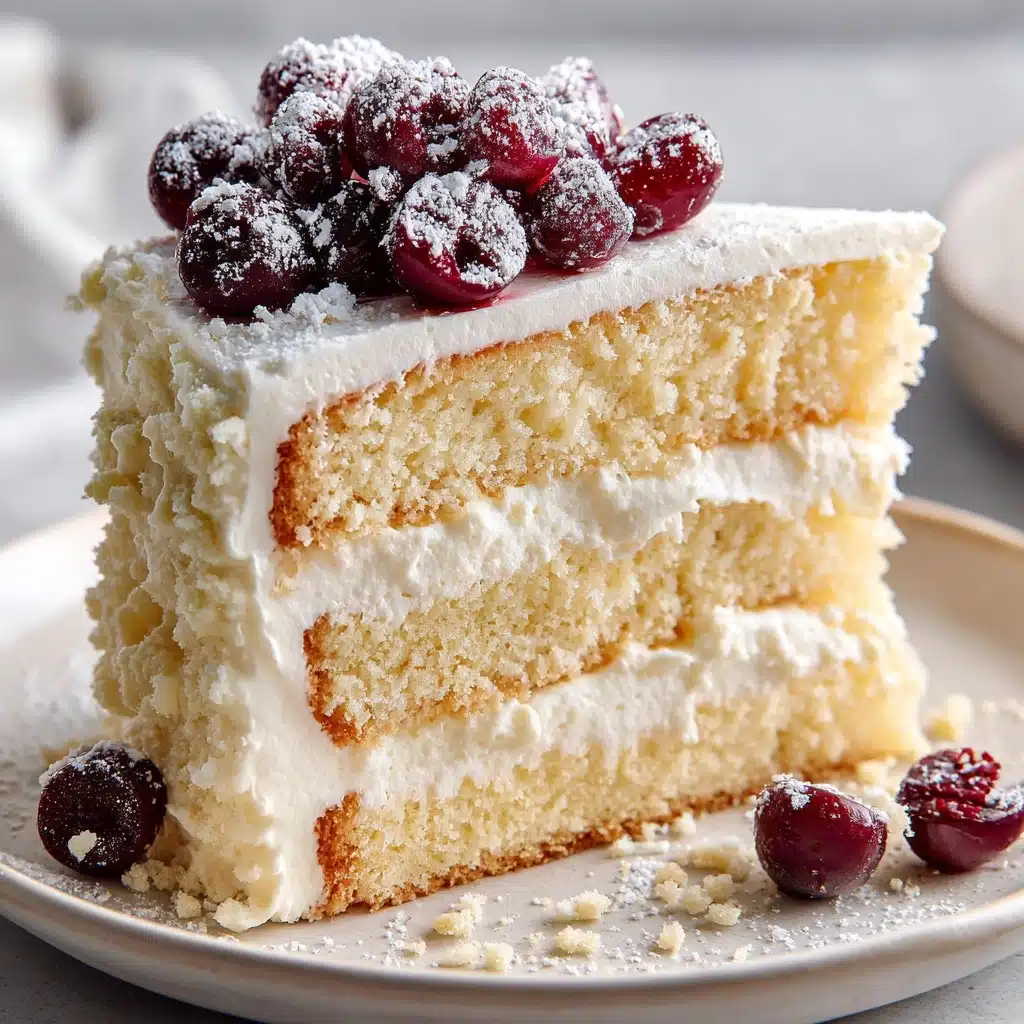
Carefully place one cooled meringue layer on your serving platter. Spread the chocolate buttercream over the top in a thick, generous layer. Top with the second meringue round. Cover the entire cake (top and sides) with the vanilla buttercream, smoothing for a lovely finish. Get creative with your decorations—add nut fragments, a dusting of confectioners’ sugar, or even chocolate shavings for a playful look.
Step 7: Chill Before Serving
Transfer the assembled Kiev Cake to your refrigerator and let it chill for at least several hours, preferably overnight. This not only melds the flavors but makes slicing clean and dramatic. Trust me, the anticipation is worth every second!
How to Serve Kiev Cake
Garnishes
A sprinkle of toasted nuts or a dusting of confectioners’ sugar can instantly elevate your Kiev Cake’s visual appeal. For a special occasion, try finely grated dark chocolate, swirls of extra buttercream, or a handful of jewel-like berries to add a burst of color and freshness.
Side Dishes
Since Kiev Cake is rich and a bit of a showstopper, keep side pairings light and bright. Serve each slice with fresh strawberries, sliced pears, or even a tangy fruit compote. A cup of strong black tea or espresso is the classic Ukrainian way to round out the experience and cut through the cake’s sweetness.
Creative Ways to Present
Bring extra flair by making individual mini Kiev Cakes, perfect for parties or intimate gatherings. Or use a stencil to dust a pretty design with confectioners’ sugar right before serving. For birthdays, accent the top with edible flowers, chocolate shards, or even a drizzle of caramel sauce—let the occasion inspire you!
Make Ahead and Storage
Storing Leftovers
After celebrating, store leftover Kiev Cake tightly covered in the refrigerator. Its layers and flavor continue to develop in the cold, making the next-day slices extra dreamy. Just keep it on a plate with an inverted bowl or under a cake dome to prevent drying out.
Freezing
You can freeze Kiev Cake (whole or sliced) with great results! Wrap well in plastic wrap and then foil, and freeze for up to two months. Thaw overnight in the refrigerator before serving; note that the meringue may soften slightly, but all the flavors will still shine.
Reheating
No reheating needed—Kiev Cake shines when served chilled! Simply allow slices to sit at room temperature for about 10 minutes before enjoying, so the buttercream softens to its best, creamy texture.
FAQs
Can I use other nuts besides hazelnuts or cashews?
Absolutely! While hazelnuts and cashews are traditional for Kiev Cake, almonds or walnuts make great substitutes. Just be sure to toast them for the best flavor, and chop them finely to keep the meringue layers delicate.
What’s the best way to get clean, even slices?
For the sharpest slices, chill Kiev Cake well before cutting. Use a long, sharp, serrated knife and wipe it clean between each cut. If you like, dip the knife in hot water and dry it before each slice for even neater edges.
Can I make Kiev Cake ahead of time?
Yes! Kiev Cake actually gets better as it rests. Assemble the cake a day in advance and refrigerate overnight. This lets the flavors meld and makes serving effortless.
Is there a substitute for sweetened condensed milk in the frosting?
If you’re looking for an alternative, try a mixture of softened cream cheese with some powdered sugar and a splash of vanilla. The result will be tangier but still deliciously creamy—though it won’t be entirely traditional.
Why did my meringue crack or sink?
Cracking or sinking typically happens if the meringue cools too quickly or if it wasn’t whipped long enough. Always let the layers cool gradually in the oven with the door ajar, and make sure you’ve beaten your egg whites to stiff, glossy peaks before folding in the flour and nuts.
Final Thoughts
Kiev Cake has a reputation for stealing the spotlight at any gathering, and once you taste its tender nut layers and dreamy buttercream, you’ll see why. Whether you’re baking for friends, family, or simply to indulge your own curiosity, I encourage you to roll up your sleeves and give this Ukrainian treasure a try—it’s a true labor of love with rewards in every bite!
Print
Kiev Cake Recipe
- Total Time: 1 hour 30 minutes plus chilling
- Yield: 12 servings 1x
- Diet: Vegetarian
Description
Kiev Cake is a classic Ukrainian dessert known for its delicate meringue layers filled with sweet, creamy goodness. This decadent nut cake is a labor of love but well worth the effort for any special occasion.
Ingredients
Meringue Layers:
- 8 large egg whites, room temperature
- 1 1/4 cups granulated sugar
- 1 cup finely chopped toasted hazelnuts (or cashews)
- 2/3 cup all-purpose flour
- 1/4 teaspoon cream of tartar
- Pinch of salt
Filling and Frosting:
- 1 cup unsalted butter, softened
- 1 can (14 ounces) sweetened condensed milk
- 1 teaspoon pure vanilla extract
- 1/4 cup cocoa powder
- 2 tablespoons confectioners’ sugar (for dusting, optional)
Instructions
- Prepare the Meringue Layers: Preheat the oven to 300°F (150°C). Line two 9-inch round cake pans with parchment paper and grease the sides. Beat egg whites until soft peaks form. Gradually add sugar, then fold in flour and nuts. Bake until golden.
- Make the Filling and Frosting: Beat butter until fluffy, then mix in condensed milk and vanilla. Divide into two portions, adding cocoa to one. Assemble the cake with layers of meringue and cream.
- Chill and Serve: Refrigerate the cake for several hours or overnight before slicing. Enjoy!
Notes
- Kiev Cake is traditionally made with hazelnuts or cashews for a rich flavor and texture.
- Chilling the cake overnight enhances the taste and makes slicing easier.
- Prep Time: 40 minutes
- Cook Time: 50 minutes
- Category: Dessert
- Method: Baking
- Cuisine: Ukrainian
Nutrition
- Serving Size: 1 slice
- Calories: 430
- Sugar: 40 g
- Sodium: 80 mg
- Fat: 25 g
- Saturated Fat: 12 g
- Unsaturated Fat: 11 g
- Trans Fat: 0 g
- Carbohydrates: 45 g
- Fiber: 2 g
- Protein: 7 g
- Cholesterol: 85 mg