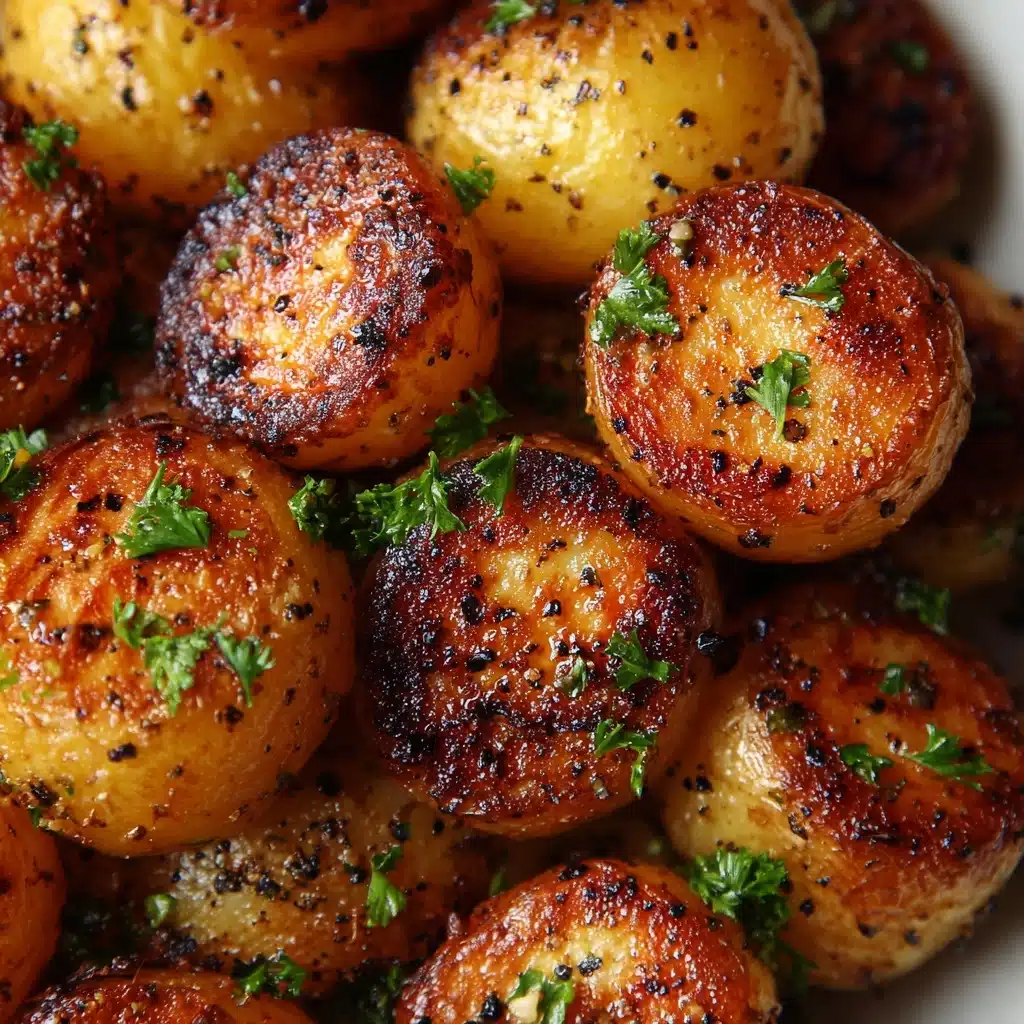
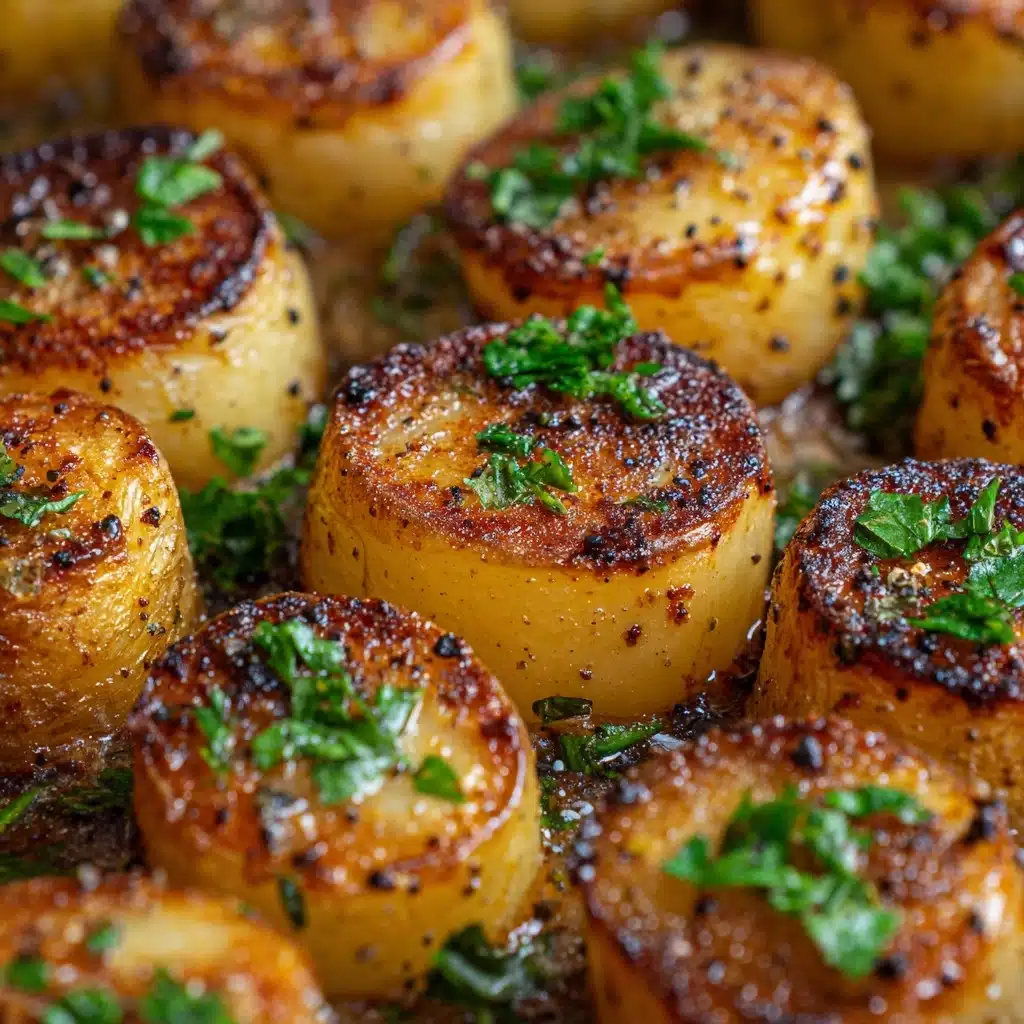
Garlic Potato Pops Recipe
If you’re in the mood for a snack that’s crispy on the outside, soft and cheesy on the inside, and absolutely brimming with garlicky goodness, look no further than these Garlic Potato Pops. These bite-sized wonders are the kind of treat you’ll crave on movie night, at parties, or when you simply want to spoil yourself. Each pop shines with golden crunch, a melt-in-your-mouth center, and the unmistakable flavor of fresh garlic. They’re budget-friendly, easy to make, and certain to become your new favorite crowd-pleaser.
Ingredients You’ll Need
With only a handful of kitchen staples, you’re just a few steps away from irresistible Garlic Potato Pops. Each ingredient here plays a pivotal role—adding flavor, crunch, color, or that extra dose of comfort we all love in a great snack.
- Potatoes: Opt for starchy varieties like russets for a fluffy, smooth mash that holds together beautifully.
- Garlic: Freshly minced garlic packs in bold aromas and a classic zing that defines these pops.
- Cheddar Cheese: Shredded cheddar melts effortlessly, giving a gooey, savory twist to every pop.
- Parmesan Cheese: Adds a salty, nutty depth plus encourages a golden-brown crust when fried.
- Fresh Parsley: Brings a splash of green and a pop of freshness that balances the rich, cheesy filling.
- Egg: Acts as the binder, ensuring all that tasty filling holds together once shaped.
- Breadcrumbs: Coats each pop in a fragrant, crunchy layer—panko works beautifully for extra crispiness!
- Salt: Enhances all the flavors and gives just the right savory snap.
- Black Pepper: A hint of heat that deepens the garlicky profile.
- Vegetable Oil: For frying, providing that craveable, golden finish; use a neutral oil for best results.
How to Make Garlic Potato Pops
Step 1: Boil and Mash the Potatoes
Start by peeling and dicing the potatoes into even chunks to ensure they cook quickly and evenly. Place them in a pot of salted water and bring to a boil. Simmer for about 15 minutes, or until they’re fork-tender. Drain well and mash thoroughly until ultra-smooth—no lumps allowed! The smoother your base, the creamier your Garlic Potato Pops will turn out.
Step 2: Add the Flavor Boosters
With your potatoes still warm, mix in minced garlic, cheddar cheese, Parmesan, chopped parsley, the egg, salt, and black pepper. Stir or mash everything together until thoroughly incorporated. The warmth will help melt the cheeses gently, creating a cohesive, flavorful mash loaded with herby and garlicky goodness.
Step 3: Shape into Pops
Once the mixture is combined and just cool enough to handle, scoop out small portions and roll into bite-sized balls. Aim for about one-inch diameter, so they cook through and become delightfully poppable. This is a great step for little helpers—just be sure the mixture isn’t too hot!
Step 4: Coat with Breadcrumbs
Place breadcrumbs in a shallow bowl. Roll each potato ball gently in the crumbs until evenly coated. This step is the secret to that golden, audibly crisp shell—you want every bit covered so your Garlic Potato Pops emerge as crunchy as possible.
Step 5: Fry to Golden Perfection
Heat about 1-2 inches of vegetable oil in a deep skillet over medium heat. When a breadcrumb dropped in the oil sizzles on contact, it’s ready. Fry the potato pops in batches, turning gently to brown all sides. They’ll need 3-4 minutes to become deep golden and irresistibly crispy. Drain on paper towels as you work through the batches.
Step 6: Serve and Enjoy!
Let the Garlic Potato Pops cool just a minute or two (they’re steamy inside!) then serve warm with your favorite dipping sauces. You’ll love how the garlicky center melts in your mouth, right alongside a crunchy bite and gooey cheese pull.
How to Serve Garlic Potato Pops
Garnishes
The finishing touch can really set your Garlic Potato Pops apart. Try a fresh sprinkle of chopped parsley, an extra dusting of Parmesan cheese, or a tiny pinch of flaky sea salt for elegant visual appeal and heightened flavor. If you want to go bold, drizzle with a little garlic butter or serve with a scattering of thinly sliced green onions for that snappy, savory fragrance.
Side Dishes
Garlic Potato Pops are the star of any snack spread, but they pair wonderfully with tangy coleslaw, roasted veggies, or a crisp leafy salad. For gameday or parties, serve them alongside sliders, wings, or a veggie platter for the ultimate finger food feast. Their cheesy, garlicky flavor also makes them a perfect partner to simple tomato soup if you want to round out a cozy meal.
Creative Ways to Present
Presentation makes everything more fun! Pile them high on a platter with multiple dipping sauces (think sriracha mayo, ranch, or marinara), skewer them with toothpicks for easy grabbing, or serve in mini paper cones for a street-food vibe. For parties, create a DIY “pop bar” with different toppings and dips, letting guests customize their own Garlic Potato Pops for a memorable, interactive snack experience.
Make Ahead and Storage
Storing Leftovers
If you’re lucky enough to have leftovers, store cooled Garlic Potato Pops in an airtight container in the refrigerator. They’ll keep their flavor and texture for up to three days, making them a perfect snack to pack in a lunchbox or whip out as a quick, satisfying bite.
Freezing
Garlic Potato Pops freeze surprisingly well! Arrange the unfried, breadcrumb-coated pops on a baking sheet and freeze until solid, then transfer to a freezer-safe bag up to a month. When the craving hits, fry (or bake) straight from frozen—no thawing necessary—just add a couple extra minutes to the cooking time for piping hot, crispy results.
Reheating
To revive the crunch, reheat leftover Garlic Potato Pops in a 400°F oven or air fryer for 7-10 minutes until hot and crisp. The microwave will heat them but won’t deliver that signature crust, so try to re-crisp in the oven when possible. They’ll taste almost as fresh as the day you made them—and maybe even better with a hot dipping sauce on the side!
FAQs
Can I bake Garlic Potato Pops instead of frying?
Absolutely! For a lighter version, preheat your oven to 400°F, arrange the pops on a parchment-lined baking sheet, and bake for about 20 minutes, turning once halfway through. They’ll still get crunchy, especially if you use panko breadcrumbs, though the color may be a bit lighter than frying.
Can I add extras like bacon or green onions?
Yes—get creative! Stir in cooked bacon bits or sliced green onions with the cheeses for another layer of flavor. You can also experiment with jalapeños, chives, or even swap the cheddar for pepper jack for a spicy kick.
What kind of potatoes work best?
Starchy potatoes like Russet or Yukon Golds are perfect here. They mash up fluffy and smooth, which helps your Garlic Potato Pops hold their shape and gives that melt-in-your-mouth center.
How do I keep the pops from falling apart while frying?
Make sure your mashed potato mixture isn’t too wet—drain the potatoes thoroughly—and don’t skip the egg. If the mix feels loose, you can chill it for 20-30 minutes or add a little extra breadcrumb to firm it up. Handle with care when frying, and fry in small batches for best results.
Can I make Garlic Potato Pops ahead for a party?
Definitely! You can shape and bread the pops up to a day in advance and refrigerate them until you’re ready to fry or bake. This is perfect when you want to prep ahead and enjoy stress-free entertaining (with the ultimate crispy, gooey reward)!
Final Thoughts
Trust me, once you try Garlic Potato Pops, you’ll find reasons to make them for every gathering—or just a treat for yourself. They’re endlessly customizable, always a hit, and bring that homemade magic that store-bought snacks just can’t match. I can’t wait for you to dig in and fall in love with this utterly comforting, crave-worthy snack!
Print
Garlic Potato Pops Recipe
- Total Time: 35 minutes
- Yield: 24 pops 1x
- Diet: Vegetarian
Description
These Garlic Potato Pops are crispy, cheesy, and packed with savory garlic flavor. They make the perfect party snack or appetizer for any occasion.
Ingredients
Potato Pops:
- 4 large potatoes (peeled and diced)
- 4 cloves garlic (minced)
- ½ cup shredded cheddar cheese
- ¼ cup grated Parmesan cheese
- 2 tablespoons fresh parsley (chopped)
- 1 large egg
- ½ cup breadcrumbs
- 1 teaspoon salt
- ½ teaspoon black pepper
- vegetable oil for frying
Instructions
- Boil and Mash Potatoes: Boil diced potatoes in salted water until tender, about 15 minutes. Drain and mash until smooth.
- Prepare Potato Mixture: Stir in minced garlic, cheddar cheese, Parmesan cheese, parsley, egg, salt, and pepper until well combined.
- Form and Coat: Form mixture into small bite-sized balls. Roll each ball in breadcrumbs to coat evenly.
- Fry: Heat vegetable oil in a deep skillet over medium heat. Fry potato pops in batches for 3–4 minutes or until golden brown and crispy. Drain on paper towels.
- Serve: Serve warm with your favorite dipping sauce.
Notes
- For a healthier option, bake the potato pops at 400°F for 20 minutes, turning halfway through.
- You can add cooked bacon bits or green onions for extra flavor.
- Prep Time: 20 minutes
- Cook Time: 15 minutes
- Category: Snack
- Method: Boiling and Frying
- Cuisine: American
Nutrition
- Serving Size: 4 pops
- Calories: 250
- Sugar: 2g
- Sodium: 400mg
- Fat: 10g
- Saturated Fat: 4g
- Unsaturated Fat: 5g
- Trans Fat: 0g
- Carbohydrates: 30g
- Fiber: 3g
- Protein: 6g
- Cholesterol: 40mg